Customising the Remote Image on your Slingplayer
Written by: Al Richey
Until now you have been limited to using the Remote Image supplied by Sling Media, either as a realistic image or as the default image. But thanks to some clever work by 'BobShanghai' we have figured out a way to customize the image. There are various reasons why you might want to do this:
- Make cosmetic changes to the existing image (changing Japanese characters to English or vice-versa)
- Change the color of the remote (black to silver or vice-versa)
- Make often-used buttons bigger.
- Replace the existing remote image with a completely different one.
- Replace the existing remote image with one you have designed yourself. Particularly the default image, which has a number of limitations.
Note: At this stage this customization works only with the browser WebPlayer and the new Desktop Player, and only on a Windows machine. Hopefully we can find someone with a Mac who can test the idea for us. It is unlikely we will ever be able to change the iPad realistic remote and most other devices use a non-realistic image which we cannot change.
This Wiki is laid out in 4 sections:
- An Introduction as to how Slingplayer remotes work and the essential things you need to know.
- A tutorial on How To Make Cosmetic Changes To Your Existing Remote.
- A tutorial on How To Replace Your Remote With A Generic, Customizable Image (that I have designed).
- An In-Depth Look At The XML files (if you want to make major changes or design your own remote).
Introduction
First you have to identify the location where the images are stored. On a Windows machine these are at
C:Users<..your name..>AppDataRoamingSling MediaWebSlingPlayerRemote
Note: You will need to make sure you have ‘Hidden Items” checked in File Explorer as the folder AppData is normally hidden. For Windows 8 click on the View menu option and the checkbox is displayed:
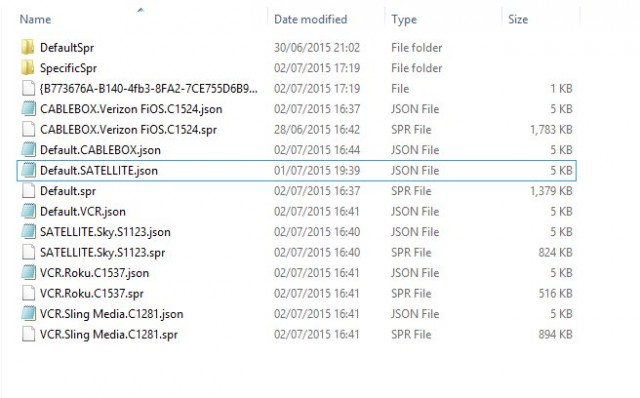
This is what the folder looks like on my PC:
This is because I have multiple Slingboxes, being fed with a Verizon FIOS cable box, A Roku box, A Sky satellite box and a Slingcatcher. Each device has a JSON file and an SPR file. Then there are 2 folders, SpecificSpr, which contains the files for the remote currently being used, and DefaultSpr which contains the files for the default remote image. Hopefully yours is simpler.
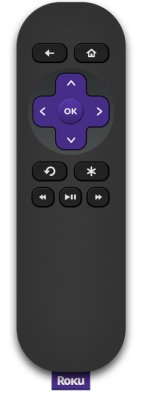
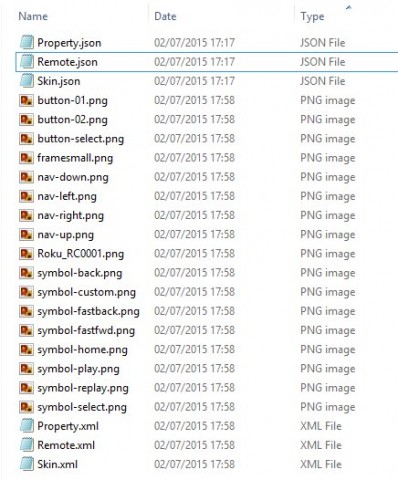
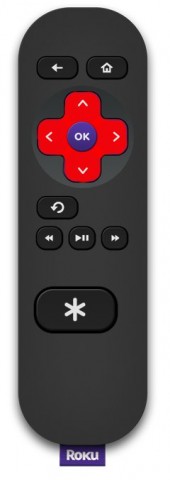
The way the Slingplayer works is that when you select an input it picks the associated .SPR file and then ‘unpacks’ it into the SpecificSpr folder. If I watch my Roku box (a very simple remote image shown below), then when I look in that folder I see this:
There are 3 JSON files, which we can safely ignore, 3 XML files at the bottom and then all the various PNG images that are used to build the remote. You should see a foreground picture, a background picture and the all the required buttons.
Unfortunately, if you make any changes to these files, they are simply overwritten next time you start the player which is why we have been unable to produce different images.
The breakthrough came when BobShanghai figured out the before Slingplayer picks the remote SPR file and ‘unpacks’ it , it looks through all the other folders under Remotes to see if it can find a valid remote. If it does then it uses that remote instead, and we have total control over that folder. So all we need to do is create our own folder with a valid remote image. Let’s start with a simple exercise.
How To Make Cosmetic Changes To Your Existing Remote
Note: You cannot make changes to the default remote using this method. If you want to do that see Section 3.
- Startup either the browser player or the Desktop player.
- Make sure your remote image is displayed (to ensure it has been unpacked into the SpecificSpr folder)
- Shut down the Player (this is ESSENTIAL, as any changes we make will only take effect when the player is started and the remote is loaded. Any subsequent changes will be ignored until the next time the player is started, although a switch of inputs will also work)
- Go to the Remote folder using File Explorer
- Rename the SpecificSpr folder to something else (MyNewRemote for example)
- Restart the player.
On the face of it nothing has changed. But behind the scenes Slingplayer is actually using the contents of the new folder to display the remote image. To prove it:
- Shut down the player
- Go into the new folder
- Pick one of the PNG button images and change the extension from .png to .pngtemp
- Restart the player
- You should find the button has ‘disappeared’
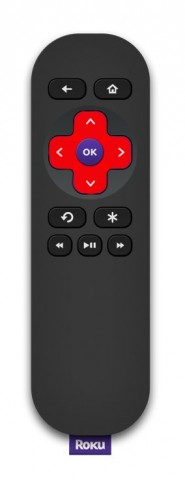
Now try loading the foreground picture into your favourite graphics program and make a change. Here I changed the arrow buttons on my Roku from Blue to Red.
So now you know how to change the design of the ‘skin’ and change the design and colour of any of the buttons.
Now let’s try something a bit more advanced.
Moving, Adding or Deleting a button
We now have to get our hands dirty on one of the XML files. If you are not familiar with XML it stands for eXtended Markup Language and it is simply a text file using a standardised format. The basic idea is that everything is split into Sections and these are marked using following method
- <Section One>
- …….
- <Section Two>
- ………..
- ………..
- <Section Two)
- <Section One>
So in this case, the tag (as it is called) <Section One> marks the beginning of the section and <Section One> marks the end of the section.
If you see the ' characters these denote a comment and are not used in the file.
Now, we are going to make a slight amendment to the SKIN.XML file, don’t worry if you don’t understand the whole file, I will cover that in a later tutorial. Again I am going to use my Roku as an example.
- Open SKIN.XML in a text editor (Notepad?)
- Scroll down until you find the <SMLayouts> tag
- Scroll down further and you will find lines starting <Control id=…., one for each button.
- So in my example I have
<Control id="id.remote.star" type="button" backgroundID="img.button.01" foregroundID="img.symbol.custom" x="160" y="312" cx="80" cy="48" />
This means that the 'star' button is of the type 'button' (more about that in the later tutorials), it says what the foreground and background images are and then 'x=' & 'y=' define the location and 'cx=' & 'cy=' define the size of the button. So I change x="150" to x="100" to move it left 50 pixels, y="312" to y="460" to move it down the remote, and finally cx="80", cy="48" to cx="160", cy="96" to double it in size. So I saved the SKIN.XML file. and restarted the player and this is the result:
The 'Star' button has moved down and across and doubled in size.
So having learned how to move a button, the rest is straightforward. To delete a button simply delete the complete <Control id=…> section.
It's also worth noting that you can add as many new folders as you like, so you can customise ALL your devices with a new remote image.
Happy tinkering !!
How To Replace Your Remote With A Generic, Customizable Image
Many devices, where Sling have not designed a realistic remote, use the standard default remote that looks like this:
As a builder of Custom Remotes for unsupported devices I have long been critical of the Default/Basic Remote design. My main complaints were:
- It did not look like an actual remote, it was very 2-dim€ensional.
- It was too large for many screens so had to have scroll buttons at the top to switch between different parts.
- There was a long-term bug that stopped both the ‘Track +/-‘ and ‘Skip+/-‘ buttons being defined at the same time. Although this was reported to Sling a long time ago nothing has been done to fix it.
- It did not have colour buttons for the Mac Slingplayer and for the DVD Remote.
- It did not display the Custom buttons so the user had to go to the Menu to use them.
- The Custom buttons could not be renamed so the user had to try and remember what function they carried out.
- Nothing could be changed, the user was stuck with the design, functionality and implementation.
So I have designed a new Remote that gets around those problems. It looks like this:
And has the following advantages:
- It now has dedicated Skip+/- and Track +/- that work.
- Proper colour buttons for all designs
- Proper buttons for Custom 10-18
- Button labels can be renamed
- Remote is fully configurable.
So if you want to replace your remote image with this one then carry out the following actions:
- Download my Custom Remote package from here
- Read the introduction of this Wiki and make sure you understand the working of the system
- Start the Slingplayer and make sure your original remote is being displayed.
- Shut down the Slingplayer.
- Go to the Remote folder and create a new sub-folder.
- Copy the contents of my Custom Remote package into the folder.
- Now go to the SpecificSpr folder and open the REMOTE.XML file with a text editor.
You should see near the top a Section:
- <Links>
- </Links>
And within this Section one or more
<Link k=”……” remote=”….“ keymap=”….”/>
We are interested in the k=”…..” entries
Make a note of the k= entries, there may be one or more.
Note: If the entries are
- <Link k="ANTENNA" remote="Keypad" keymap="TUNER”?>
- <Link k="CABLEANT" remote="Keypad" keymap="TUNER"/>
- <Link k="ANTENNA.ATSC" remote="Keypad.atsc" keymap="TUNER"/>
- <Link k="PVR" remote="PVR-VCR" keymap="PVR"/>
- <Link k="VCR" remote="PVR-VCR" keymap="VCR" />
- <Link k="CABLEBOX" remote="STB" keymap="CABLEBOX"/>
- <Link k="SATELLITE" remote="STB" keymap="SATELLITE"/>
- <Link k="DVDP" remote="DVD" keymap="DVDP"/>
- <Link k="DVDR" remote="DVD" keymap="DVDP"/>
- <Link k="PVR.SMTEST" remote="SMTEST" keymap="PVR"/>
- <Link k="SATELLITE.*.S0775" keymap="SATELLITE.S0775" />
- <Link k="DVDP.Philips" keymap="DVD.Philips" />
- <Link k="DVDR.Philips" keymap="DVD.Philips" />
- <Link k="DVDP.CyberHome" keymap="DVD.Cyberhome" />
- <Link k="DVDP.CyberHome.Y0816" keymap="DVD.Cyberhome.Y0816" />
- <Link k="CABLEBOX.TVA.C1753" keymap="idmap.TVA.1753" />
- <Link k="PVR.TVA.V1752" keymap="idmap.TVA.PVR" />
Then you are probably using the default remote image already so we need to follow a slightly different procedure. This time go back into the Remote folder. Make a note of the filename associated with the remote. It will be something like
- CABLEBOX.Custom.C2010
- SATELLITE.Custom.S2013
- VCR.Brand.V0987
So make a note of that,
- Now go into the new folder and open my copy of REMOTE.XML.
- Near the top you will see:
- <Links>
- <Link k="CABLEBOX.Custom.C2010" remote="My Custom Remote" keymap="idmap.custom"/>
- </Links>
- So now you need to replace the "CABLEBOX.Custom.C2010" with the value that you noted from your original remote or from the filename. Do NOT change the rest of the line.
- Save the file
- Start the Slingplayer and you should see my new Remote in place of yours.
And now you can go back to the previous Section and customise it as you wish.
An In-Depth Look At The XML files
If you want to do major surgery on the Remote Image or you need to design your own from scratch then you need to understand how the XML files work. The XML files in my Custom Remote package are full commented but let’s look at each one in turn:
[CONTENT_TYPES].XML
We can ignore this as it is just a header file for the packages.
PROPERTIES.XML
In the beginning Sling defined 81 possible buttons. All the basic ones are there, plus a few more common ones such as Fav, Slow, Eject… Then they added 29 Custom Buttons for any additional functions that were specific to a device. Since then they have made 2 changes:
First they redefined Custom 01-09 to take account of the arrival of the PIP (Picture in Picture) function. So:
- Custom 01 (53) became PIP
- Custom 02 (54) became PIP Format
- Custom 02 (55) became PIP Freeze
- Custom 02 (56) became PIP Swap
- Custom 02 (57) became PIP Move
- Custom 02 (58) became PIP Source
- Custom 02 (59) became PIP CH+
- Custom 02 (60) became PIP CH-
- Custom 02 (61) became PIP Multi
Them, when Colour buttons became common they allocated them to Custom 22-26. So
- Custom 22 (74) became Red
- Custom 23 (75) became Green
- Custom 24 (76) became Yellow
- Custom 25 (77) became Blue
- Custom 26 (78) became White
So this XML file contains all the definitions for the 81 buttons. We could amend the file if we wanted but it isn’t necessary as you will see later we can overrule these default definitions in the REMOTE.XML file. So my advice is leave it alone !!
REMOTE.XML
This file defines the remote and has just one main Section that uses the tag <RemoteDB> It has 5 sub-sections using tags called <Links>, <Remote>, <KeyMaps>, <Strings> and <Shortcuts>.
The <Links> section is where we have the actual code that Slingplayer will recognize when it is searching other folders for a valid remote. So we need to make sure the ‘k=’ entry is correctly matched to the remote we originally installed on the associated input. It also has entries ‘remote=’ and ‘keymap=’. These are just internal variables that are used later in the file. Their purpose is to allow us to have multiple remotes within the single REMOTE.XML file. For us, if we want multiple reotes it is easier just to create a new folder, so for our purposes we can just leave them alone.
The <Remotes> section has a sub-section <Remote> where we give our remote a unique GUID (Globally Unique Identifier) number. We haven’t figured how unique this has to be, but have given some alternative values if you need them. Again it allocates an internal variable ‘name=’ but this is only used later in the <Strings> section. But is does have a sub-section using the tag <Layout>, and this is important as it is used in the SKIN.XML file so they need to match. Again you can have multiple <Remote> sections defined here although we won't use that facility.
The <KeyMaps> section is where we can overrule the values given in PROPERTIES.XML. In my example I have defined separate buttons for the new Track +/- buttons and for the colour buttons.
The <Strings> section just allows us to define our own variables for use later. I just use it to give the remote a name.
Finally the <Shortcuts> section does what it says and allows you to define keyboard shortcuts.
So the bottom line is that we are probably best leaving this file alone except for making sure the ‘k=’ entry matches the one for the remote we are replacing and maybe adding shortcuts.
SKIN.XML
This is the main file where the actual remote image is built, and the one where most of the changes will be carried out. Again it has a single Main section using the tag <SMTheme>, with 2 sub-sections using the tags <SMStyle>, which contains all the definitions, and <SMLayouts> where the actual image is designed.
<SMStyle> has 3 subsections, <ImageStates>, <TextStates> & <ImageList>.
<ImageStates> is used to set up the buttons so that they look different depending on the state they are in. These states allow the button to display differently, depending on whether it is disabled, enabled, pressed, hovered over, selected…) You will have noticed that the PNG files for the buttons often have 4 or 5 images, one for each state. The changes can either be an intensifying of the colour or a slight offsetting of the display. I have defined two ImageStates, one for PNG files with 4 images and one for files with 5 images.
<TextStates> does exactly the same for buttons with text overlays. It allows you to change the text style depending on the state of the button. Again I have defined two states, one for White on Black and one for Black on White.
<ImageList> is where we actually define all the buttons we are going to use. You will see that each button is given an ID, what type it is ( ‘image’ or ‘text’), and how many images are in the PNG file, Then it uses the tag <Image> to say which PNG file to use, the tag <ImageStateRef> to specify which ImageState to use and the tag <StretchType> to define the state (I assume whether it can be resized or not. I suggest you always use type="StretchEven")
Finally we get to the <SMLayouts> section where we actually build the remote. Each <SMLayout> section (one for each remote so we only need one) specifies the layout (remember that was used in REMOTE.XML) and the background file. Then we use the tag <Control id> to place each button. As an example:
<Control id="id.remote.play" type="button" backgroundID="img.button.transport" foregroundID="img.symbol.play" x="90" y="40" cx="40" cy="40" />
This tells us that the ‘Play’ button should be of type ‘button’, it should use the appropriate background that we defined earlier in <ImageList> for the transport buttons. It should add the ‘Play’ image onto the button, be 40x40 pixels (cx & cy) and be positioned at 90, 40.
If you don’t want an image on the button (colour buttons) leave foregroundID=””
If you want text on the button add text=”…” (See the Power button as an example)
That covers all the details of the XML files and should enable you to build your own remote.

