Connecting IR to your remote
Back to IR Help
Connecting To The Remote
- Check for the latest Updates.
- Read the Release Notes that came with your IR.EXE
- Download the latest RDFs.
- The RDFs are no longer packaged with IR you need to get these separately
- Forum Index -> Download Database -> JP1 File Section -> Tools -> Main RDFs still under development can be found at the JP1 forum. Forum Index -> Download Database -> JP1 File Section -> Tools -> RDF Files
- Tell IR where the downloaded RDFs are located.
- File -> Set Directory -> RDF Path ->
- Navigate to the folder where your RDFs are stored select the Directory (RDF's should be displayed in the Files window), Click OK.
- Tell IR what type of cable you are using JP1-Parallel, JP1-Serial, JP1-USB, or JP1.x.
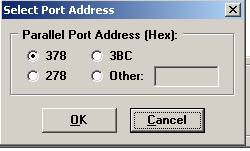
- PARALLEL (JP1)
- If you chose parallel you will be asked to specify the Port Address. This value defaults to 378. If you don't know your parallel port address and can't find out by reference to the documentation that came with your computer, you can try each of the three settings in the Port Address selection box and see which one responds to the Check Interface test
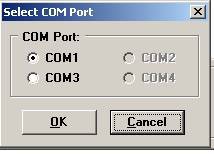
- SERIAL (JP1)
- If you chose Serial you will be asked to which com port address
- USB - (JP1)
- The USB option is for the an older JP1 USB EEPROM cable. Do not use this for a USB JP1.x cable. You will need to install the necessary drivers before the USB option will be enabled. The procedure varies depending on what operating system you are using. Download the WinUSB Instructions and the WinUSB32 or WinUSB64 drivers from the JP1 Tools->Drivers section. These drivers are not nessessary if you are using the EEPPROM adapter with a JP1.2/3 FLASH cable.
- JP1.x
- Use the JP1.x for any communcication with a JP1 FLASH type cable. The JP1.x cables come in a serial or a USB connection. The JP1.x cable is a true serial cable.
- You will also need to make sure you have the JP1.x driver in your IR working folder.
- Now Select Driver Status from the Interface menu.
- Open the battery cover of your remote and plug in the interface cable.
- Select Check Interface from the Interface menu. Hopefully you will now receive the following message:
- Your remote interface check has succeeded!
- If you did not get this message please see the Troubleshooting the interface section below.
- If you are using an EEPROM Interface experiment with Select: Auto detect JP1 EEPROM type, Force <2k ,or Force >=4k from the Interface menu.
- Most users should leave it set to Auto Detect. However, if you have a remote, such as the URC-9960 or the URC-8060, that has a 4k EEPROM installed and the Auto Detect mode cannot handle it properly (the most common symptom is that the data is wrapped around causing the "no data in signature" message), then select "Force >= 4k" and try to download
- Press the [Download from Remote] button.
- IR will now look through the RDFs in the location you specified, and try to find the best match according to the signature it found in the data sent from the remote. You will notice that the title bar changed to reflect the type of remote it is.
- You are now ready to save the information to an IR file.
- Select Save as from the File menu.
- You will want to have a copy of your setup before you start playing with your remotes memory. Make sure to give your file that describes it accurately. You will probably have several versions of your IR file before you are completely happy with it.
- Note: If you are starting with an OEM remote, a RAW Download is STRONGLY recommended.
- When you did the normal downloaded, IR may have made some silent changes or even asked to make some changes. While this usually isn't a problem, its still better to err on the side of caution. A good insurance policy would be to download and save a RAW Image before you start working on a remote. To do that you need to go to the Advanced menu and Enable Raw download.
- Advanced->Enable RAW Download
- A [Raw Download] button should have appeared in the "middle button area" of the general tab, and/or as a new option on the toolbar. If neither the middle buttons nor the toolbar is on, you will need to turn on one or both of those options with the Tools->Options menu item.
- Press the [Raw Download] button and wait for the download
- Then save that image using File->Save from the menu.


Troubleshooting the Interface
If you built your own interface, see the instructions on trouble shooting the interface. Make sure the connector is sitting on all 6 pins. Make sure the connector is not upside down.
Batteries
For Parallel Cables a.k.a. the Simple Interface try various battery configurations For all the other types of cables, strong batteries are beneficial when communicating with the remote, but this is not always true for the parallel interface cable. The JP1 simple interface is very sensitive to the charge in memory. Try various battery configurations to see if you can establish communications. You may need to try the download with batteries, without batteries, with old batteries, with new batteries, with one battery reversed. As long as were talking about batteries, it is important that the batteries have a snug fit. The remote manual recommends alkaline batteries, but many of the JP1 users use rechargeables just fine. However you want to stay away from the cheapy no-name batteries because they are not always standard size, and loose batteries in your remote can make the remote act up, especially if you are using an extender
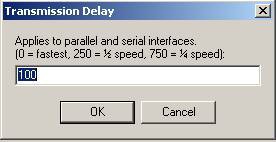
Try Adjusting the transmission Delay
- From the Advanced select Transmission Delay and change it from 0 to 400 , which slows things down a bit so we're not trying to outrun the interface


Cable Issues
Make sure you are not trying to talk to a JP1 remote with a JP1.x cable. Make sure you are not trying to talk to a JP1.x remote with a JP1 cable. How can you tell what kind of remote it is?
- See Chapter 1 JP1 or JP1x
Were you trying to use an old EEPROM type cable with a serial or parallel to USB adaptor?
- The JP1 EEPROM cable will not work with a serial to USB adapter because, rather than using true RS232 serial communications as a JP1.x cable does, the JP1 EEPROM cable uses a couple of control lines in "bit bang" mode to clock data directly to/from the EEPROM, and the USB port wouldn't have a clue what the signals are. So a JP1.x serial FLASH cable can use an USB adapter, the JP1 serial EEPROM cable can not. Likewise, the Parallel cable will not work via a Parallel to USB adapter. You have to have a specifically built JP1 USB cable. Different parts, different price, etc. Check out the Marketplace section.
NO RDF Found
If you get that message you most likely didn't set your folder correctly. Check to see that your folder is set correctly. If that fails to fix things please see Chapter 1 - RDFs.
If your issues are not resolved, talk to the experts at the JP1 forum.
Congratulations!
If you made it this far you've probably got your remote connected and have downloaded from your remote.
HINT: Typically the JP1 connector in your remote is surrounded by a notched box printed on circuit board. The pins might be numbered, but if not, the notch indicates pin 1. Now that you have your interface working, take the time to make sure pin 1 is clearly marked on the cable. As you acquire different jp1 remotes, it will make your jp1 life much easier to know which way to plug your interface into the remote.
JP1 Pin arrangement
5 3 1
6 4 2
