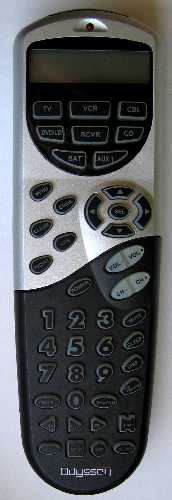
How to Program your One For All® Remote(Model URC-8600)
Click
here for device setup codes.
Setting The ClockThis procedure allows you to set the time of day that will bedisplayed on the main screen of your remote.
- HOLD DOWN the SETUP button until the screen reads,"TIMED SEQ".
- TAP the MENU DOWN (-) button twice. The screen should read,"CONFIGURE".
- TAP the SELECT button once. The screen should read,"THEATR SEL".
- TAP the MENU DOWN (-) button once. The screen will read,"TIME SETUP"
- TAP the SELECT button once. The screen will read,"TIME" with the clock on the left and the first number flashing.
- ENTER the correct time using the number pad (if the time number is 1-9 you have to enter 0 first ex:09).
- Use the MENU DOWN (-) button to change between AM and PM. TAP the SELECT button to enter your choice.
- Use the MENU DOWN (-) button to change the day. TAP the SELECT button to enter your choice.
NOTE: At any point you can press escape (ESC) to return to the maindisplay.
Setting Up Your Devices (TV, VCR, Cable,Tuner, etc.) - FIND the 3-digit setup code for your brand of device (TV, VCR, Cable, etc.)
You can find the setup codes in your URC-8600 manual or at: http://www.oneforall.com/index2.html - TAP the DEVICE key (TV, VCR, etc.) that you want to set up.
- HOLD DOWN the SETUP button until the screen on the remote reads, "TIMED SEQ" - release.
- TAP the MENU DOWN (-) button once, the screen will read CODE SETUP.
- TAP the SELECT button once - the screen will read, "DEV SET UP"
- TAP the SELECT button once - the screen will have the device name on the left side. EX. TV
- ENTER the setup code and then TAP the SELECT button once.
- TAP the POWER button. If the device does not shut off, repeat steps 6 & 7 with the next setup code.
NOTE: For VCR, DVD and LD, it is best to have the device on, a tape or disc in, and test the device with the PLAY button. - When you find a code that works your device - TAP the ESC(escape)button to exit. The screen will return to the device name and the time of day.
NOTE: At any point you can press escape (ESC) to return to the maindisplay.
Search MethodThis will allow you to search through all of the setup codes for aparticular device (TV, VCR, Cable etc.) to try to find one that matches up withyour particular equipment.
NOTE: Only use this method if you have already tried all of the setupcodes listed in your manual for the brand of device you have. - TAP the DEVICE (TV, VCR, etc.) button you wish to find a code for.
- HOLD DOWN the SETUP button until the screen reads,"TIMED SEQ" - release
- TAP the MENU DOWN (-) button once. The screen will read CODE SETUP.
- TAP the SELECT key once. The screen will read,"DEV SET UP".
- TAP the MENU DOWN (-) button once. The screen will read,"DEV SEARCH".
- TAP the SELECT button once - the screen will have the device name on the left side. EX. TV
- TAP the TAP the POWER button.
If the device does not shut off TAP the MENU DOWN (-) button once. The remote will move to the next code. Try POWER again (repeat until the device shuts off).
NOTE: For VCR, DVD and LD, it is best to have the device on, a tape or disc in, and test the device with the PLAY button. - TAP the SELECT button once when you get the device to turn off (locks in code).
NOTE: At any point you can press escape (ESC) to return to the maindisplay.
Finding Your CodeUse this sequence to check which code is set to a DEVICE button: - TAP the DEVICE key you want to find the code for.
- HOLD DOWN the SETUP button until the screen reads TIMED SEQ.
- TAP the MENU DOWN (-) button once, the screen will read CODE SETUP.
- TAP the SELECT button, the screen will read DEV SET UP.
- TAP the MENU DOWN(-) button twice, the screen will read DEV NUMBER.
- TAP the SELECT button, the screen will have the DEVICE name (TV, VCR, etc.) on the left and the code on the right.
Redefining A Device Button--MODE MAPThis procedure allows you to change a DEVICE (TV, VCR, CABLE,etc.)button from one mode to another (For instance: CBL to TV). This is useful if youhave more than one of a certain device. - TAP the DEVICE (TV, VCR, CABLE,etc.) button that you want to change.
- HOLD DOWN the SETUP button until the screen reads,"TIMED SEQ".
- TAP the MENU DOWN (-) button twice. The screen will read,"CONFIGURE".
- TAP the SELECT button once. The screen will read,"THEATR SEL".
- TAP the MENU DOWN (-) button three times. The screen will read,"MODE MAP".
- TAP the SELECT button once. The screen will read,"SOURCE".
- TAP the DEVICE (TV, VCR, CABLE,etc.) button you wish to move. The screen will read,"COPY TO".
- TAP the DEVICE (TV, VCR, CABLE,etc.) button you wish to move it to. The screen will return to the main display with the original device and the time.
NOTE: At any point you can press escape (ESC) to return to the maindisplay.
To set a DEVICE (TV, VCR, CABLE,etc.) button back to its original mode; followthe same steps as above, but hit the same DEVICE button twice.
That DEVICE button is now set back to its original mode.
Timed SequencesThe Odyssey remote has a feature that lets a user set up aseries of key strokes that will be played back at a specific time, up to sevendays later.
You can use these timed sequences with any component you have the remoteprogrammed for. You can store up to a total of ten (10) sequences in the memoryof the Odyssey remote with each sequence having a maximum of 15keystrokes.
- HOLD DOWN the SETUP button until the display screen reads TIMED SEQ.
- TAP the SELECT button - the screen will read ADD MACRO.
- TAP the SELECT button - the screen will read START on the left and the time will be flashing on the right.
- ENTER the time you wish to start the macro using the number pad. Use MENU UP and MENU DOWN to change between AM and PM.
- TAP the SELECT button,the screen will read ONCE.
- TAP the MENU DOWN (-) button to toggle between ONCE, DAILY, and WEEKLY.
- TAP the SELECT button and the screen will give you the day of the week (won't display on DAILY).
- TAP the MENU DOWN (-) button to change the day of the week on which you wish the sequence to start.
- TAP the SELECT button, the screen will read ENTER SEQ.
- ENTER the desired sequence - screen will read ESC TO END.
- Once you have entered the desired sequence, press the ESC button to end.
(At any point you can press ESC to return to the main display) NOTE: If you create a sequence to turn components ON, you will have tocreate a seperate sequence to turn them OFF!
CLEAR TIMED SEQUENCES - HOLD DOWN the SETUP button until the screen reads TIMED SEQ
- TAP the SELECT button, the screen will read ADD MACRO
- TAP the MENU DOWN (-) button will read DEL MACRO
- TAP the SELECT button the screen will display the first timed sequence programmed into the remote. Use MENU DOWN (-) to change them.
- TAP the SELECT button, the screen will flash DELETED then change to either the next macro or to the main display.
- Repeat step 5 until all macros you desire to delete are gone.
Sleep TimerThe Odyssey remote has a built in sleep timer only for components thatdo not have their own sleep timer.
- The SLEEP button can be used on devices that HAVE THEIR OWN SLEEP TIMER by just pressing the SLEEP and adjusting the time using the MENU DOWN (-) button. The word SLEEP will appear on the screen and will not go off unless:
 | The SLEEP timer times out - the amount of time you set it for is up.
| You once again hit the SLEEP button, and then hit he ESC button. |
|
- The SLEEP LOCK mode is used to enable the remote to use a sleep timer for all modes at once. The devices that already have a sleep timer will use their own, the ones without a sleep timer will use the remote's internal timer.
| When SLEEP LOCK is enabled - you still have to use the SLEEP button to activate and put time on the timer and the same rules ( a & b) above apply. |
Sleep LockThe sleep timer will automatically turn off any device that is operatedby the remote and is on.
To ENABLE the SLEEP TIMER:
- HOLD DOWN the SETUP button until the screen reads TIMED SEQ.
- TAP the MENU DOWN (-) button twice, the screen will read CONFIGURE.
- TAP the SELECT button, the screen will read THEATR SEL.
- TAP the MENU DOWN (-) button six times. The screen will read SLEEP LOCK.
- TAP the SELECT button, the screen will read DISABLE.
- TAP the MENU DOWN (-)button, the screen will read ENABLE.
- TAP the SELECT button, the screen will return to the main display and the built in sleep function will be active in all modes.
To DISABLE the SLEEP TIMER:
- HOLD DOWN the SETUP button until the screen reads TIMED SEQ.
- TAP the MENU DOWN (-) button twice, the screen will read CONFIGURE.
- TAP the SELECT button, the screen will read THEATR SEL.
- TAP the MENU DOWN (-) button six times. The screen will read SLEEP LOCK.
- TAP the SELECT button, the screen will read ENABLE.
- TAP the MENU DOWN (-)button, the screen will read DISABLE.
- TAP the SELECT button, the screen will return to the main display and the built in sleep function will be inactive in all modes.
REMEMBER: The word SLEEP will remain on the screen of your remote until:
 | The SLEEP timer times out - the amount of time you set it for is up.
| You once again hit the SLEEP button, and then hit he ESC button. |
|
Volume LockThis feature will let one device control the volume ONLY in theTV, VCR, CABLE, and DBS mode.
- HOLD DOWN the SETUP button until the screen reads TIMED SEQ.
- TAP the MENU DOWN (-) button twice, the screen will read CONFIGURE.
- TAP the SELECT button, the screen will read THEATR SEL.
- TAP the MENU DOWN (-) button twice, the screen will read VOL LOCK.
- TAP the SELECT button once, the screen will change to UNLOCK.
- TAP the MENU DOWN (-) button once to change to LOCK.
- TAP the SELECT button, the screen will show the last device you used.
- TAP the DEVICE button where you want to volume to come from.
- TAP the SELECT button, and that device will control the volume ONLY in the TV, VCR, CABLE, and DBS modes.
- To reset the volume back to the original devices, do 1-3 above, then TAP the SELECT button. The screen will read UNLOCK. Then TAP the SELECT button and you will return back to the main screen - the volume will be reset.
Key MoverThis feature allows you to move functions from one button on the keypadto another.
- HOLD DOWN the SETUP button until the screen reads TIMED SEQ.
- TAP the MENU DOWN (-) button twice, the screen will read CONFIGURE.
- TAP the SELECT button, the screen will read THEATR SEL.
- TAP the MENU DOWN (-) button five times, the screen will read KEY MOVER.
- TAP the SELECT button, the screen will read FROM.
- TAP the DEVICE button where you wish to take the function FROM.
- TAP the button you wish to move. The screen will read TO.
- TAP the DEVICE button where you want to move TO.
- TAP the button you want to move the function TO, the screen will go back to the main display.
Now the button you chose will operate that function of the button you movedfrom.
Clear AllThis procedure will clear all of the KEY MACRO, KEY MOVER,TIMED MACRO,and VOLUME LOCK. It will not clear any of the SETUP CODES.
- HOLD DOWN the SETUP button until the screen reads TIMED SEQ - release
- TAP the MENU DOWN (-) twice, the screen will read CONFIGURE
- TAP the SELECT button, the screen will read THEATR SEL
- TAP the MENU DOWN (-) key seven times, the screen will read CLEAR ALL
- TAP the SELECT button, the screen will read CLR ALL
- TAP the SELECT button, the screen will read, CONFIRM
- TAP the SELECT button, the screen will return to the main display.
The BatteriesThe URC-8600 remote takes 4 AAA batteries. We recommend fresh alkalinebatteries. We do not recommend the use of "rechargeable" batteries inour remote.
|