Your 6-pin looks neater than my JP1.2 interface.
What would UEI do if you sent one to them for an upgrade? Solder on some pads?
Is there space at the butt end to cut a hole and to shoehorn in a 8P8C, RJ45, Firewire or other common socket?
JP1.x-ing it looks like a lot of effort for a fairly average-looking remote. I suppose if one were to go to the trouble of cutting holes and inserting sockets it would be worth going the extra inch and modding the coloured LEDs.
New Radio Shack remote: 15-100
Moderator: Moderators
-
The Robman
- Site Owner
- Posts: 21897
- Joined: Fri Aug 01, 2003 9:37 am
- Location: Chicago, IL
- Contact:
Probably not at the bottom of the remote, but maybe in it's mid-section.underquark wrote:Is there space at the butt end to cut a hole and to shoehorn in a 8P8C, RJ45, Firewire or other common socket?
I agree, this is not a remote for JP1 use, which is a pity as it seems to be a pretty good remote. Hopefully, we can give them enough constructive critism that the next OFA remotes will be perfect!
As to the other question, UEI doesn't upgrade RS remotes.
Rob
www.hifi-remote.com
Please don't PM me with remote questions, post them in the forums so all the experts can help!
www.hifi-remote.com
Please don't PM me with remote questions, post them in the forums so all the experts can help!
-
underquark
- Expert
- Posts: 874
- Joined: Mon Jun 20, 2005 4:58 am
- Location: UK
My original post started off as "If they did it...would they..." but I lacked the linguistic ability - at the time - to complete such a sentence given that the kids were playing up (it's virtually 24h day here at present and we're going on holiday [vacation] tomorrow). Incidentally, since acquiring a couple more 8910s the oldest brat has suddenly decided he prefers my 8820 on account of he now knows the keys and I've put input-changing macros on the device keys. Said macros run like an LKP when placed on the device keys of the 8820 but seem to operate more rapidly when placed on [Shift]-Device Key. 8820 looking good, so far; but I still keep looking at that 3K or so "wasted" learning memory space and yearning for an extender (of sorts).The Robman wrote:As to the other question, UEI doesn't upgrade RS remotes.
Here, here! YES! Finally a remote with all of the PVR buttons in the right place, AND it's backlit, AND more devices than my 6131! I think I'll be picking up one of these and playing with it VERY soon.mr_d_p_gumby wrote:But not to be overlooked here is the fact that this non-Kameleon remote actually has a backlight!The Robman wrote:2) It has the same backlight characteristic as the URC-8910, etc where the light turns off while you hold a button down.
Rob, based solely on your pics, it looks possible to make something of a header that would go in the battery compartment, but we'll soon see.
Man, if this is what it appears to be, the WAF will absolutely skyrocket! A dedicated live tv button, backlighting, and great PVR oriented button positioning. Awesome.
-
speaker.guy
- Exile Island Resident
- Posts: 260
- Joined: Tue Apr 17, 2007 12:16 pm
-
The Robman
- Site Owner
- Posts: 21897
- Joined: Fri Aug 01, 2003 9:37 am
- Location: Chicago, IL
- Contact:
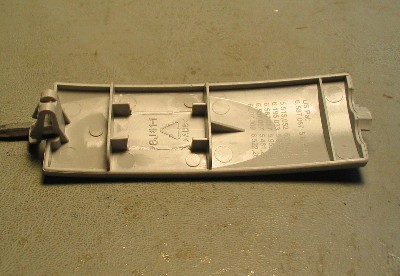
The holes are not the "punch thru" type, so in addition to cutting a hole in the casing inside the battery compartment, you would need to solder something in to make pads that connects thru to the traces on the other side, with the intent being that you would use a pogo-pin adapter. However, you wouldn't be able to leave the batteries because they would be in the way of the adapter, and with JP1.x remote you need to have power in the remote in order for the JP1.x cable to work.jherrick wrote:Rob, based solely on your pics, it looks possible to make something of a header that would go in the battery compartment, but we'll soon see.
Tommy's idea is to leave just two batteries in and hold something in place to complete the circuit. He says that 3v should be enough to power the flash for this purpose (but we haven't tried it). A more practical solution would be to power the remote using a 4-battery holder connected to the two terminals.
All in all, there isn't a good JP1 solution for this remote, which is a pity.
Rob
www.hifi-remote.com
Please don't PM me with remote questions, post them in the forums so all the experts can help!
www.hifi-remote.com
Please don't PM me with remote questions, post them in the forums so all the experts can help!
-
Wesley Hester
- Posts: 7
- Joined: Sun Jul 17, 2005 7:32 pm
- Location: Selma, AL, USA
- Contact:
Great information. I only just learned about this remote from a Radio Shack sales paper I just read today that I got this weekend. Came here first of course and couldn't believe alll the information and pictures ALREADY posted!
"I think Tommy Tyler is going to try to come up with a more elegant solution for the masses."
I hope someone can because I would really like to give this remote a go.
"I think Tommy Tyler is going to try to come up with a more elegant solution for the masses."
I hope someone can because I would really like to give this remote a go.
Visit my website and click on 'Resources' at the top and then on 'Remote Files' to view and download my KeyMap Master (.txt) and Remote Maser (.rdmu) files.
-
The Robman
- Site Owner
- Posts: 21897
- Joined: Fri Aug 01, 2003 9:37 am
- Location: Chicago, IL
- Contact:
I think the only possible solution that we can come up with is something like this...
1) find some small nails where the pin part of the nail is small enough to fit into the holes and the head is large enough to form a pad, but not so large that it will touch the nail next to it. Then trim these nails so that the length of the pin that's visible on the other side of the PCB is about the same as it would be if you were sticking a regular 6-pin into the hole. Then finally, solder these shortened nails into the 6 holes.
2) cut a hole in the casing inside the battery compartment so that the 6-pad JP1 connector is visible.
3) build a pogo-pin adapter like this:

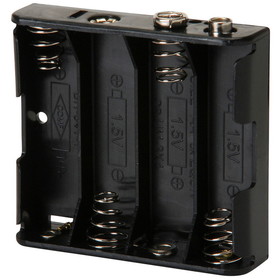
4) buy a 4-cell battery holder like this:
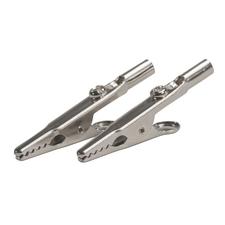
and maybe add alligator clips on the ends of the wires like this:
5) Then, to program the remote using JP1, you would remove the batteries and hook up the 4-cell holder instead, by cliping the leads onto the 2 battery terminals. Then you would connect the pogo-pin adapter to your JP1.x (or JP1.2) cable and you're all set.
As an alternative to step 4, you could get some sort of metal clip that you could use to hold 2 batteries in the remote and complete the circuit and then use the pogo-pin adapter to connect to the remote. The trouble with this method is that you need 3 hands, one to hold the clip, one to hold the pogo and another to work the mouse.
1) find some small nails where the pin part of the nail is small enough to fit into the holes and the head is large enough to form a pad, but not so large that it will touch the nail next to it. Then trim these nails so that the length of the pin that's visible on the other side of the PCB is about the same as it would be if you were sticking a regular 6-pin into the hole. Then finally, solder these shortened nails into the 6 holes.
2) cut a hole in the casing inside the battery compartment so that the 6-pad JP1 connector is visible.
3) build a pogo-pin adapter like this:
4) buy a 4-cell battery holder like this:
and maybe add alligator clips on the ends of the wires like this:
5) Then, to program the remote using JP1, you would remove the batteries and hook up the 4-cell holder instead, by cliping the leads onto the 2 battery terminals. Then you would connect the pogo-pin adapter to your JP1.x (or JP1.2) cable and you're all set.
As an alternative to step 4, you could get some sort of metal clip that you could use to hold 2 batteries in the remote and complete the circuit and then use the pogo-pin adapter to connect to the remote. The trouble with this method is that you need 3 hands, one to hold the clip, one to hold the pogo and another to work the mouse.
Last edited by The Robman on Thu Sep 21, 2017 11:25 am, edited 2 times in total.
Rob
www.hifi-remote.com
Please don't PM me with remote questions, post them in the forums so all the experts can help!
www.hifi-remote.com
Please don't PM me with remote questions, post them in the forums so all the experts can help!
-
The Robman
- Site Owner
- Posts: 21897
- Joined: Fri Aug 01, 2003 9:37 am
- Location: Chicago, IL
- Contact:
No, it's spray painted silver like the URC-8810 that Walmart used to sell.
Rob
www.hifi-remote.com
Please don't PM me with remote questions, post them in the forums so all the experts can help!
www.hifi-remote.com
Please don't PM me with remote questions, post them in the forums so all the experts can help!
Maybe not...The Robman wrote:I think the only possible solution that we can come up with is something like this...
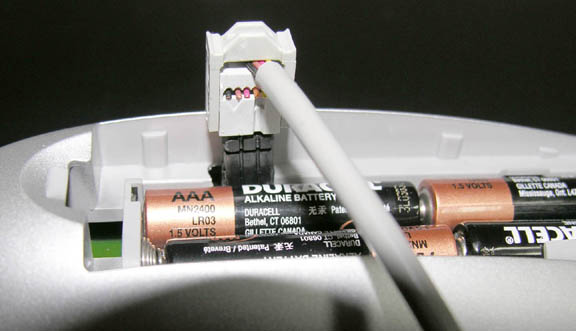
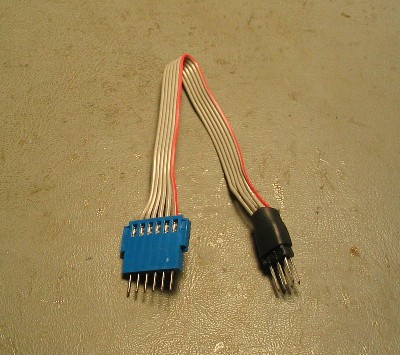
I am still working on the right cable, but I have preliminary success with that shown in the pics below. I have two of the linked cables on order.
If one were to purchase this cable (part number HF06U-06-ND) from Digikey, and this receptacle (part number 65801-006) and this plug (part number 66226-006), one could make the following modification.
Make the cuts to the battery cover as shown in this pic:
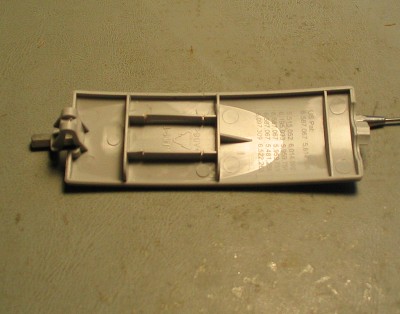
If you cut to the base of the fin, it snaps out easily with regular flat-nose pliers.
Pull back off remote, and scrape the protective coating residue from the pads where the cable will be soldered. It makes soldering a lot easier.
Route your cable under the battery clips. Note the protective electrical tape to guard against wear.
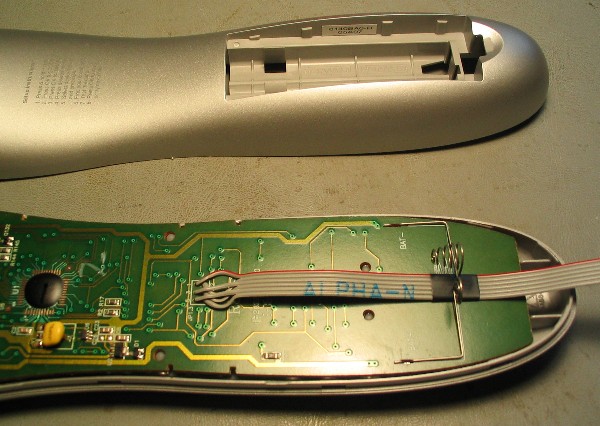
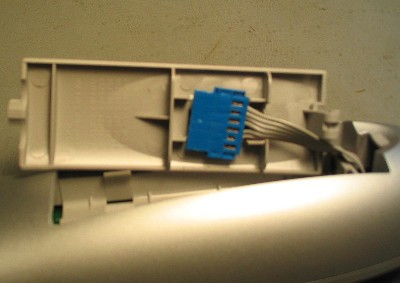
Place back on the remote and solder on your receptacle.
It will now sit comfortably in the battery cover until you need it.
Grab your handy-dandy jp1-to-FCI adapter...
and a-jp1-ing we will go, a-jp1-ing we will go!
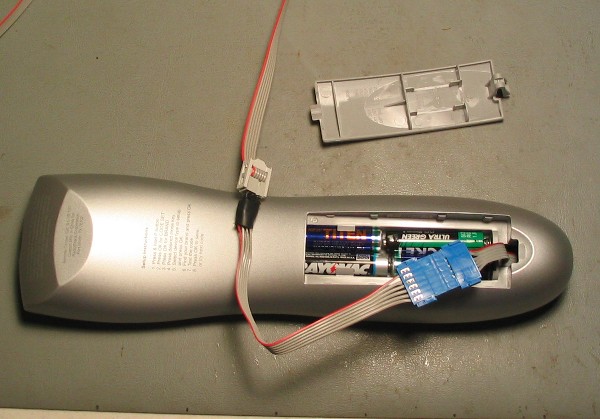
Of course, when you are done, you will want a tidy little package for family use...

Last edited by jherrick on Fri Jul 13, 2007 2:56 am, edited 1 time in total.
-
The Robman
- Site Owner
- Posts: 21897
- Joined: Fri Aug 01, 2003 9:37 am
- Location: Chicago, IL
- Contact:
Interesting ideas Jim. Good going.
Only one of those links work, maybe you should post the part numbers instead as I'm curious to see what the parts cost. I see the cable is $3.15 or $2.62 if you buy 10. Obviously, I'm thinking about the feasibility of one of us offer these ready modded.
Rob
www.hifi-remote.com
Please don't PM me with remote questions, post them in the forums so all the experts can help!
www.hifi-remote.com
Please don't PM me with remote questions, post them in the forums so all the experts can help!
-
Capn Trips
- Expert
- Posts: 3989
- Joined: Fri Oct 03, 2003 6:56 am
That's sheer genius! 8)
How come Tommy didn't come up with it?
The number of creative minds that hang out here is impressive.
So, When is Rob gonna have these modded remotes stocked up in his store?
How come Tommy didn't come up with it?
The number of creative minds that hang out here is impressive.
So, When is Rob gonna have these modded remotes stocked up in his store?
Beginners - Read this thread first
READ BEFORE POSTING or your post will be DELETED!
Remotes: OFA XSight Touch, AR XSight Touch
TVs: LG 65" Smart LED TV; Samsung QN850BF Series - 8K UHD Neo QLED LCD TV
RCVR: Onkyo TX-SR875; Integra DTR 40.3
DVD/VCR: Pioneer DV-400VK (multi-region DVD), Sony BDP-S350 (Blu-ray), Toshiba HD-A3 (HD-DVD), Panasonic AG-W1 (Multi-system VCR);
Laserdisc: Pioneer CLD-D704.
Amazon Firestick
tape deck: Pioneer CT 1380WR (double cassette deck)
(But I still have to get up for my beer)
Rob,The Robman wrote:Only one of those links work, maybe you should post the part numbers instead as I'm curious to see what the parts cost. I see the cable is $3.15 or $2.62 if you buy 10. Obviously, I'm thinking about the feasibility of one of us offer these ready modded.
Try the links now. Also, I have added the part numbers. Looking at about $6-7 for parts in quantity 1 ea, and Digikey slaps a $5.00 handling fee on if you don't have more than $25.00, so after shipping, probably about $15.00 for the DIY'er to get it done.
I would think of offering these as a kit, or offering the remote fully modded, or of you doing the same.
Jim